This post will guide you on how to install Python and configure it in the Hanlon Lab workstations. It is based on the most common difficulties and issues that arise from students and faculty trying to install and use Python environments.
Terminal
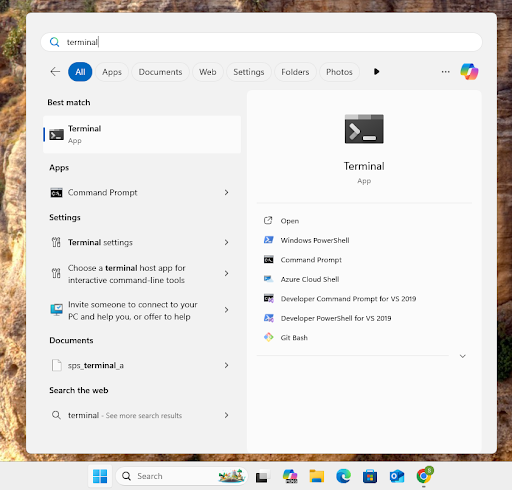
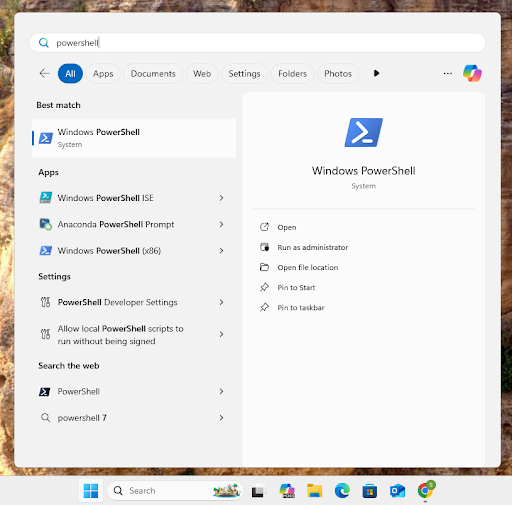
Most commands here are done through the terminal. This is to ensure reproducibility and ease of following instructions. To access the terminal on Hanlon Lab machines, search for the Terminal app. If the machine is on Windows 10, Terminal may not be available. In that case, search for PowerShell. Please note that PowerShell is distinct from “Command Prompt”/cmd. We recommend against using Command Prompt as PowerShell supports more modern features and scripting capabilities.
Basic Commands
Some basic terminal commands that will help you navigate the filesystem:
cd: change directory
PS C:\Users\shaason> cd Desktop
PS C:\Users\shaason\Desktop>
ls: list out the contents of a directory
PS C:\Users\shaason\Desktop> ls


    Directory: C:\Users\shaason\Desktop


Mode                 LastWriteTime         Length Name
----                 -------------         ------ ----
-a----          2/5/2025   9:55 AM           2354 Microsoft Edge.lnk
-a----          4/2/2025   9:35 AM           2400 Sharif - Chrome.lnk
mkdir: make a directory
PS C:\Users\shaason\Desktop> mkdir Code


    Directory: C:\Users\shaason\Desktop


Mode                 LastWriteTime         Length Name
----                 -------------         ------ ----
d-----          4/2/2025   9:54 AM                Code


PS C:\Users\shaason\Desktop> ls


    Directory: C:\Users\shaason\Desktop


Mode                 LastWriteTime         Length Name
----                 -------------         ------ ----
d-----          4/2/2025   9:54 AM                Code
-a----          2/5/2025   9:55 AM           2354 Microsoft Edge.lnk
-a----          4/2/2025   9:35 AM           2400 Sharif - Chrome.lnk
rm: remove a file or directory
PS C:\Users\shaason\Desktop> ls


    Directory: C:\Users\shaason\Desktop


Mode                 LastWriteTime         Length Name
----                 -------------         ------ ----
d-----          4/2/2025   9:54 AM                Code
-a----          2/5/2025   9:55 AM           2354 Microsoft Edge.lnk
-a----          4/2/2025   9:35 AM           2400 Sharif - Chrome.lnk


PS C:\Users\shaason\Desktop> rm Code
PS C:\Users\shaason\Desktop> ls


    Directory: C:\Users\shaason\Desktop


Mode                 LastWriteTime         Length Name
----                 -------------         ------ ----
-a----          2/5/2025   9:55 AM           2354 Microsoft Edge.lnk
-a----          4/2/2025   9:35 AM           2400 Sharif - Chrome.lnk
Ctrl Commands
If you want to exit a process in the terminal and return to the prompt, you can interrupt it by pressing Ctrl+C.
In order to copy-paste from and into the terminal, you must use Ctrl+Shift+C and Ctrl+Shift+V.
Autocomplete
The terminal has a convenient autocomplete feature when you are typing a filename that is in the current directory, when there is only one file or folder that matches the name up to the amount you have currently typed. Here’s an example:
PS C:\Users\shaason> cd Des
The only file or folder that matches these first three letters is the Desktop folder. So if you press Tab, the terminal will autocomplete this name.
PS C:\Users\shaason> cd .\Desktop\
Filesystem Conventions
. and ..
There are some special folder names (paths) in the filesystem.
. refers to the current folder
.. refers to the parent folder
So if you want to change to the parent directory, you can run
PS C:\Users\shaason\Desktop> cd ..
PS C:\Users\shaason>
Separators
The separator for names in paths is different in Windows and MacOS/Linux. By default, Windows uses the backslash (\) and MacOS/Linux use the forward slash (/). However, Windows does allow you to use the forward slash and will simply autocorrect it to the backslash if you ask it to autocomplete.
Spaces
If there are spaces in file and folder names, this can cause problems in accessing them in the terminal, since spaces are generally used to separate commands and items. For this reason, we suggest that you avoid using spaces when you create files and folders, using hyphens (-) or underscores (_) instead. If you must work with files or folders with spaces in their names, you can refer to them by surrounding them with double quotes.
PS C:\Users\shaason> cd "Saved Pictures"
PS C:\Users\shaason\Saved Pictures>
Home
Windows does not make it easy to access the “home” directory (C:\Users\userid) in the File Explorer. For this reason, we suggest that you locate all of your project files in a folder inside of Desktop instead of directly in the home directory. Then, you must navigate to Desktop and your project folder from the home directory every time you open up the terminal.
Scripts
Scripts are a powerful tool for automating the usage of the terminal. However, PowerShell does not allow the execution of scripts by default for security reasons. To bypass this, at the beginning of your terminal session, you should run
PS C:\Users\shaason\Desktop> Set-ExecutionPolicy Bypass -Scope CurrentUser
before you execute a script, like
PS C:\Users\shaason\Desktop> .\script.ps1
If you have any errors related to the running of a script, it’s likely because you forgot to run this command.
Administrator Access
Sometimes, the following pop-up will appear when you are installing a package.
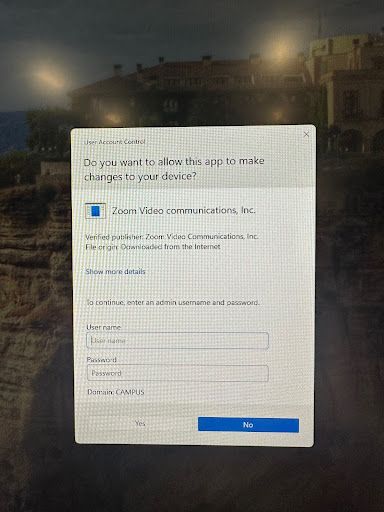
This means that installing the package requires administrator access. Please speak to one of the lab assistants and they will be able to install the package for you.
Editors
Visual Studio Code is the most popular code editor in the world with many extensions to fit almost any use case, and we recommend it for students. It can be installed through the following command:
winget install Microsoft.VisualStudioCode
Installing Python
There are many different ways to install Python. Unfortunately, the most obvious ways are also the ways that cause the most headaches.
The best way is to use the winget package manager, which is done through the terminal.
winget install Python.Python.3.12
(You may have to type Y to confirm terms and conditions if this is your first time using winget on this machine)
After you install Python (or any software) through winget, you must close and reopen your terminal to be able to use it. This is a very common issue, so to repeat: if you have just installed an app and you can’t access it, try reopening the terminal.
You can check whether Python (or many other commands) are available by checking their version.
PS C:\Users\shaason\Desktop> python --version
Python 3.12.9
We recommend using Python 3.12 for stability with many packages. Choosing a different version of Python is possible by changing the number in the install command. Before you do, always make sure that Python isn’t already installed with a conflicting version number. If it is, you should uninstall it first,
winget uninstall Python.Python.3.12
before installing your intended Python version.
Do not use the Microsoft Store! It installs Python in an unusual path that is difficult to access.
Do not use the installer on the website! It is difficult to update to a new version of Python with this.
Virtual Environments
Python is installed globally on your system, meaning that the program is accessible anywhere. However, this is often undesirable from a project management perspective. Figuring out which libraries that you need to have installed is a painful process for most people who just want their code to run.
Virtual environments (venv for short) are the solution to this problem. They isolate the complete Python environment to a single folder, which contains an activation script. When the activation script is run in the terminal, that terminal will enter the virtual environment, and all Python commands will execute with that context.
The following is a complete sequence of commands to create a new project from scratch with its own virtual environment.
mkdir projectname
cd projectname
python -m venv .venv # ".venv" is just the conventional name here, you can replace it with anything
# wait a few seconds
.\.venv\Scripts\activate
You should now see your terminal look like this:
PS C:\Users\shaason\Desktop\Code> .\.venv\Scripts\activate
(.venv) PS C:\Users\shaason\Desktop\Code>
This will signal to you that you are in your virtual environment. You will need to run that last activate line every time that you want to use Python in your project. Before you run any Python commands, please ensure that you have entered your virtual environment.
Some editors, like Visual Studio Code, have support for virtual environments and will activate them for you automatically. If you know that the terminal is activated, you can skip activation through the script, but it’s generally better to activate through the terminal just in case.
Installing Packages
The Python ecosystem has generally standardized around the pip package installer. Conda or other methods will not be covered in this guide.
The basic command to install a package is
pip install numpy # any package here
Uninstallation is similarly simple.
pip uninstall numpy
Bloomberg Terminal Access
Bloomberg Terminals are special computers that can be found in the Hanlon Lab which provide access to financial data from Bloomberg. They can be identified by their keyboards which have special colored keys. For more information, please read our full article on Bloomberg Terminals.
Bloomberg provides a Python API called blpapi. More details can be found on their website.
The following command will install blpapi:
python -m pip install --index-url=https://blpapi.bloomberg.com/repository/releases/python/simple/ blpapi
Language-agnostic documentation on using the Bloomberg API can be found here. Documentation for the Python SDK in particular can be found here. We recommend consulting the language-agnostic version for understanding how to structure your application, and referencing the Python version to understand what specific classes you must use.
There are also some third-party libraries built on top of blpapi that may provide more convenient interfaces, like xbbg and blp. If you choose to use these, please ensure that you have blpapi installed, otherwise they will not work.
Jupyter
Jupyter notebooks are a popular format for data science related work that allow users to intersperse runnable code in their reports. They are defined as .ipynb files.
For your Jupyter notebook to support running Python, you must have the Python Jupyter kernel IPython installed in your virtual environment.
pip install ipykernel
There are two main ways to run Jupyter notebooks.
You can use the official Jupyter server, which can be installed into your virtual environment
pip install jupyter
and then run from there.
jupyter server
This command will spin up a Jupyter server running on your machine. You can access the server from your web browser. If it doesn’t open automatically, you can open the URL http://localhost:8888. Note that the terminal you run the server from will be occupied, and you will need to open a new one to run other commands.
If you prefer using the editor Visual Studio Code, it has direct support for Jupyter notebooks. Just download the Jupyter extension pack and you’ll be able to run Jupyter notebooks inside your editor like any other file. No Jupyter installation required.
Deep Learning
The Hanlon Lab workstations have powerful GPUs that can be used for deep learning. The most common library used for this is torch. In order for torch to have GPU access, you must add it from the correct index URL. The following command also applies if you want to install torchvision or torchaudio with GPU access.
pip install torch --index-url https://download.pytorch.org/whl/cu124
These packages have a lot of dependencies and will take significantly longer to install than average.
Advanced Package Management
Virtual environments help isolate dependencies, but they still require you to add in libraries one by one. There are more modern solutions to help manage your dependencies in a reproducible format that is easier to set up than bespoke pip installation.
The Hanlon Lab recommended Python package manager is uv.
You can install uv using winget
winget install astral-sh.uv
To create a project in uv
uv init projectname
cd projectname
To add dependencies
uv add numpy
To run Python files
uv run main.py
By using the uv runner, you don’t have to worry about activating your Python environment. uv will manage that for you.
Most importantly, when you add dependencies using uv, it will create and add to a manifest file called pyproject.toml that lists all of your dependencies. You can copy over this file to another project and run
uv sync
to download all dependencies based on the manifest. This manifest can also be exported to a requirements.txt, a more widely used format for specifying dependencies.
uv export --format requirements-txt
A full list of the capabilities of uv are beyond the scope of this guide. You can read the linked documentation for more information. Suffice it to say that uv is at the cutting edge of Python tooling and it can fit any automation needs.
Some useful articles: